May 2, 2026Touch HMI
Control Electronics for Wood-Fired Ovens: ESP32-S3, Touch Display and Clone MAX31855s I Had to Talk Into Working
ESP32-S3MAX31855ThermocoupleHolzbackofenTouch-DisplayPlatformIOMQTTHome Assistant
Advertising note: This post contains affiliate links (marked with *). If you buy through them, I receive a small commission — the price stays the same for you.
Safety notice — rebuild at your own risk
Rebuilds at your own risk. This description is a personal documentation, not a verified build guide — you have to verify suitability for your use case yourself.
Why Put Electronics in a Wood Oven at All?
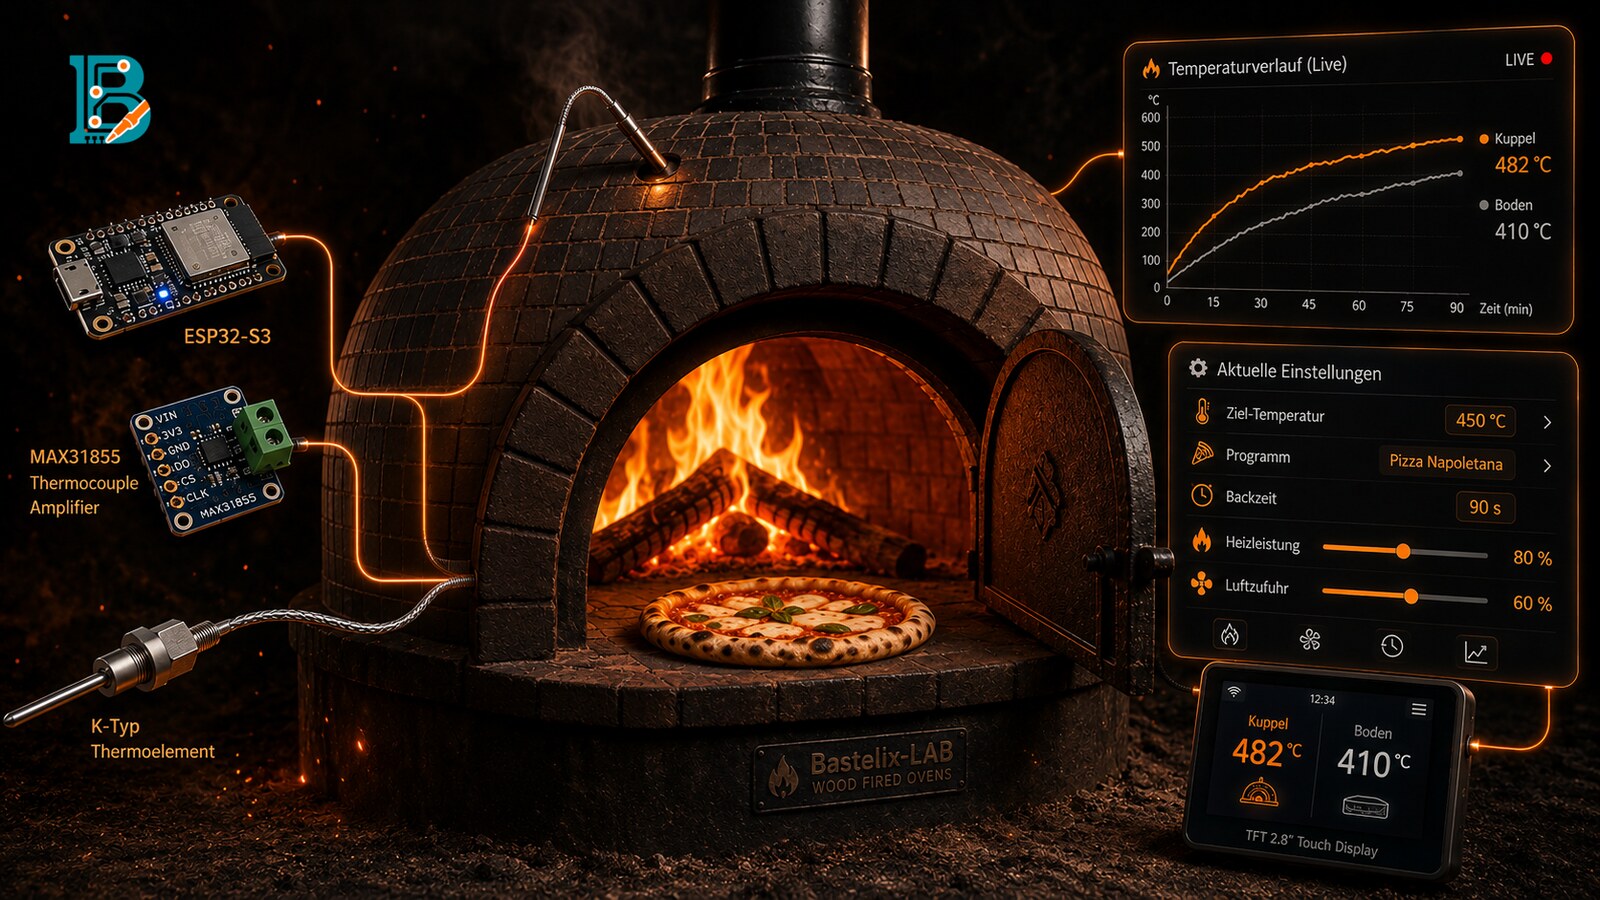
A wood-fired oven really only knows two states: too cold or too hot. Anyone who has made a Pizza Napoletana on a 470°C floor knows: 30°C too low and the dough turns rubbery, 30°C too high and the base is black before the cheese melts. Walking around with an IR thermometer is fiddly — especially while loading, feeding wood and shaping dough in parallel.
Classic pizza controllers for pros start at 600€ and usually come as a junction box without a real display. What's missing in the off-the-shelf solutions: dome and floor temperature in parallel, a live chart of the last few minutes (lets you read the cooling curve), a timer that knows what a 90-second Napoletana means vs. a 40-minute loaf of bread — and Home Assistant integration so you don't have to stand next to the oven while it heats up.
So: own electronics. ESP32-S3, 2.8" touch display, two K-type thermocouples, web UI in the browser. Under 70 euros of hardware, a long weekend of development plus a handful of evenings for polish.
What the Controller Does
The ESP32-S3 reads two type-K sheathed thermocouples (ø 3 mm, rated to 1150 °C, silicone-jacketed cable) — one sits in the dome, the second just above the baking stone. K-type is the standard for high temperatures, the 1150 °C rating gives plenty of headroom for the 500 °C the oven hits on a Napoletana.
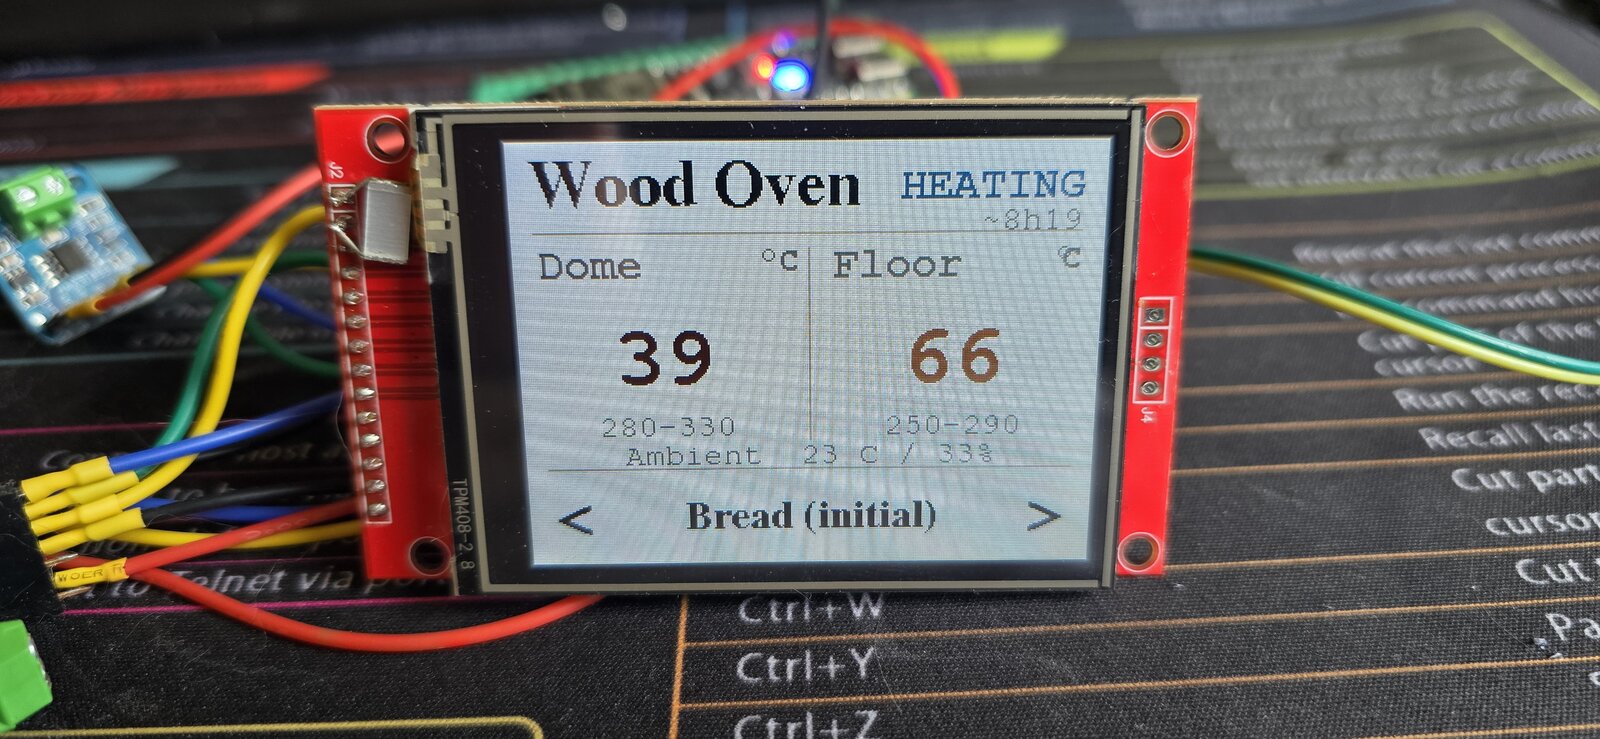
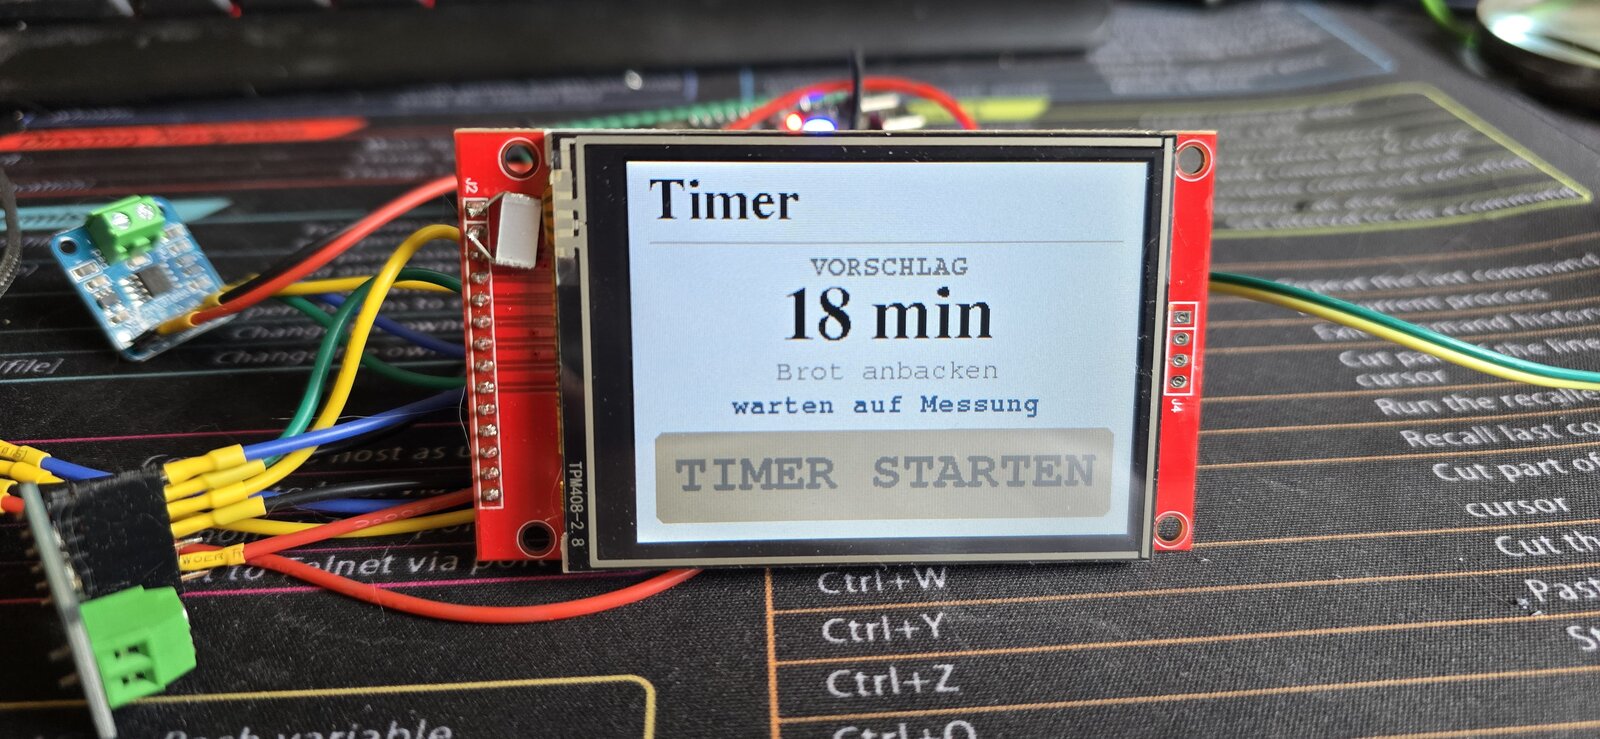
The 2.8" touch display shows five swipeable pages:
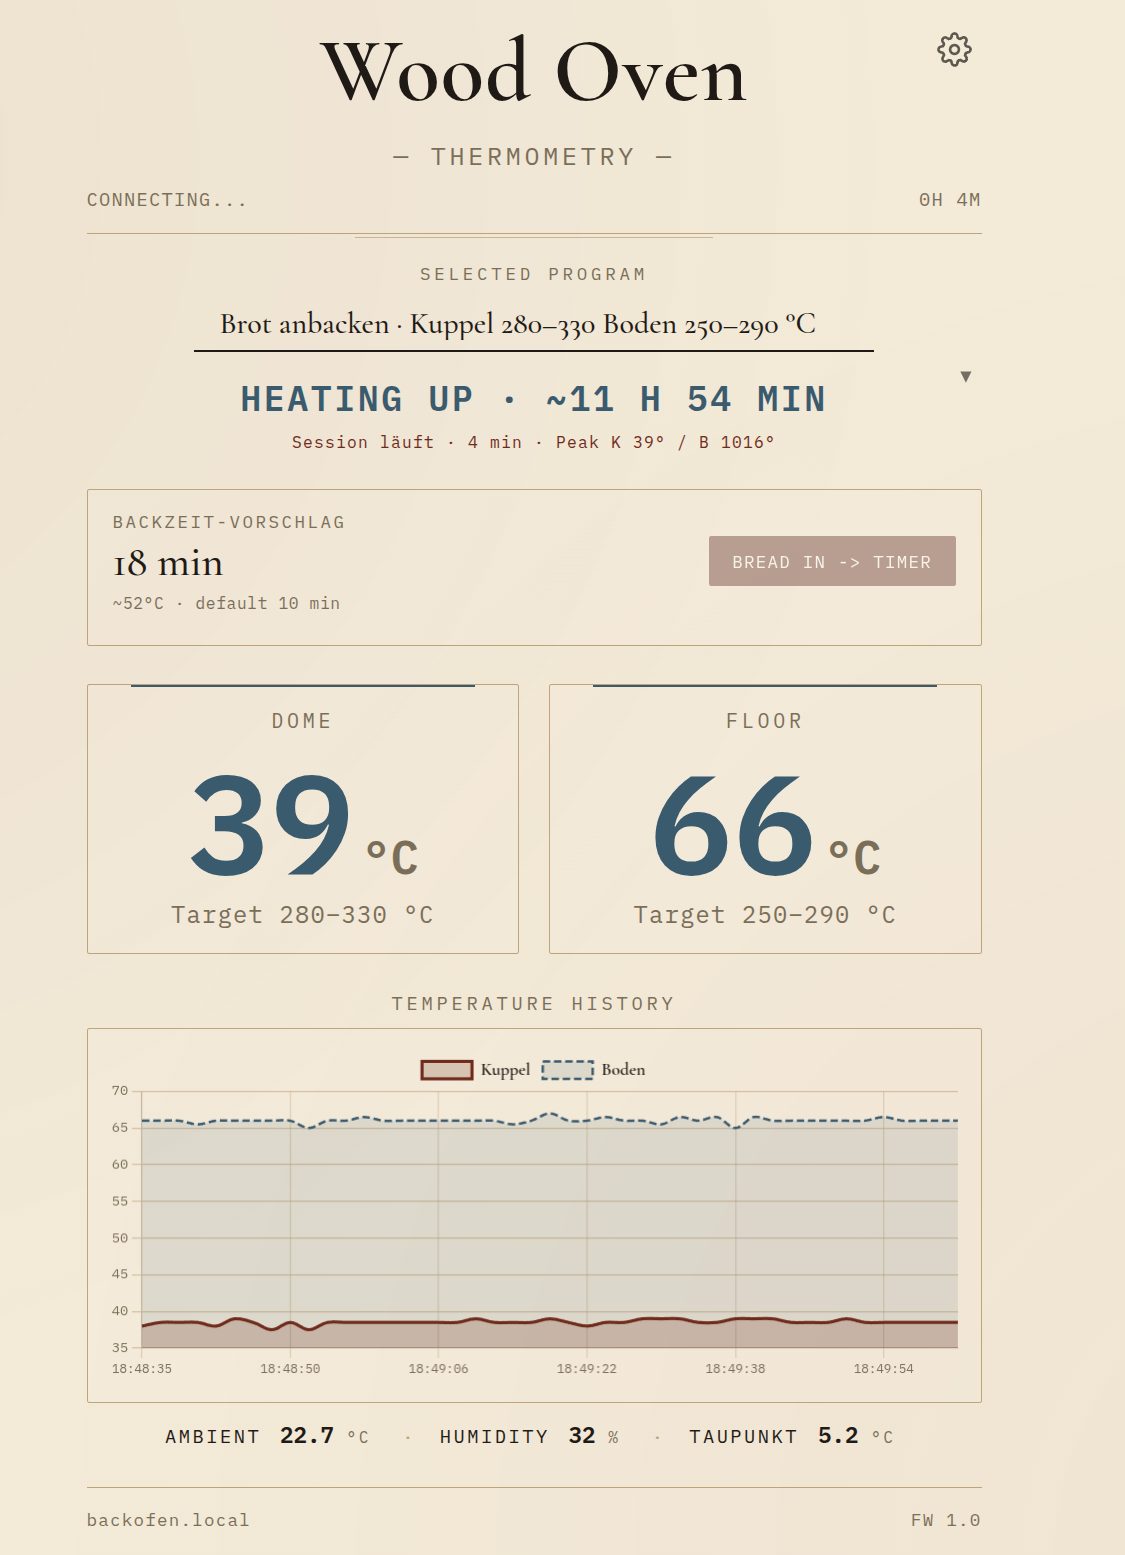
1. Main — dome and floor temperature, the current program, a "verdict" (HEATING / READY / TOO HOT / COOLING) and the timer countdown
2. Chart — live trace of the last 6 minutes with the target band of the active program
3. Timer — big buttons for start, stop, +5 min, with status
4. Network — IP, WiFi signal, MQTT status
5. System — heap, uptime, firmware
In parallel, the web UI runs with WebSocket live updates and Chart.js — phone or laptop, both views stay in sync. The web chart keeps 30 min of history (900 samples at a 2 s tick), persisted in `localStorage` — reload doesn't start from zero. Five themes (favourite: "Trattoria" with olive and terracotta), runtime DE/EN switch.
11 baking programs are built in, ordered along the natural cooling curve of a wood oven — i.e. the order in which food gets loaded on a firing day:
| Program | Dome | Floor | Default timer |
| --- | --- | --- | --- |
| Pizza Napoletana | 450-520°C | 380-450°C | 90 s |
| Pizza classic | 350-420°C | 320-380°C | 4 min |
| Tarte flambée | 300-360°C | 270-320°C | 3 min |
| Bread loading | 280-330°C | 250-290°C | 10 min |
| Bread finishing | 230-270°C | 210-250°C | 40 min |
| Bread roll / brioche | 210-240°C | 200-230°C | 15 min |
| Cake | 170-200°C | 160-190°C | 35 min |
| Braising | 150-190°C | 140-180°C | 2 h |
| Plum butter | 100-140°C | 90-120°C | 4 h |
| Drying | 55-75°C | 50-70°C | 6 h |
One firing covers pizza → tarte flambée → bread → cake → braise → plum butter → drying. Eight to ten hours of productive heat instead of one round of pizza and done.
The Hardware
Here's what's actually installed:
- **ESP32-S3 DevKit-C (N16R8)* — 16 MB flash, 8 MB PSRAM. Around 10 €. Two SPI buses in parallel, fast enough for display refresh and TC reads without races.
- 2.8" SPI TFT (ILI9341 + XPT2046)* — the standard Chinese 14-pin module for about 10 €. Touch controller already on board.
- 2× MAX31855 K-type breakout* — the clone version off AliExpress for 3 € each. Adafruit original costs 30 €. More on that in the next section.
- 2× type K sheathed thermocouple, rated to 1150 °C, silicone-jacketed cable from SensorShop24 — ø 3 mm, immersion length 250 mm (MT/S-3-250-3.0) and 200 mm (MT/S-3-200-3.0), 3 m cable with wire-end ferrules. About 60 € together incl. VAT. Important: don't take the cheap iron-style TC — the sheath has to survive oven temperatures.
- SHT31 breakout* (optional, ~5 €) — I²C sensor for ambient temperature and humidity on the case. Not in the chamber — SHT3x is only specified to 125 °C. What it enables — see the next section.
- 5 V / 2 A power supply** — a clean supply is mandatory, more on that in a sec.
Two separate SPI buses are the key: display + touch on FSPI (GPIO 11/12/13), the two MAX31855s on HSPI (GPIO 6/7). That way display refresh and TC reads can't step on each other — I also tested shared SPI with LovyanGFX bus-locking, which works *conditionally* but is noticeably less reliable.
On top: the 2.8" display backlight wants a clean supply. On a USB power bank the backlight boost flickered — the root cause was the 3.3 V rail dipping because of a weak 5 V source. A 5 V plug supply that actually delivers 2 A at the DevKit's 5 V pin and the issue is gone.
Clone MAX31855: Broken First, Usable Later
The ugliest part of the project wasn't my choice — it found me. The cheap MAX31855 clones from AliExpress at 3 € each have two quirks:
1. The open-circuit fault bit is permanently set. The Adafruit library reads that bit and immediately returns NaN — as if no thermocouple were connected. Even with a properly hooked-up TC, all you get is "—" on the display. Bug one.
2. ADC offset of 20-30°C. Even after ignoring the OC bit, the raw values are systematically shifted. Some of these modules aren't even MAX31855 — they're MAX6675 clones in a matching housing. Same footprint, different protocol.
Fix: custom raw SPI read. The chip is talked to over SPI at 5 MHz, the 32 bits are read raw, and the code decides which fault bits to trust. The OC bit gets ignored on clones — if the TC is missing, plausibility checks will catch it anyway (-200°C is obviously not a real reading).
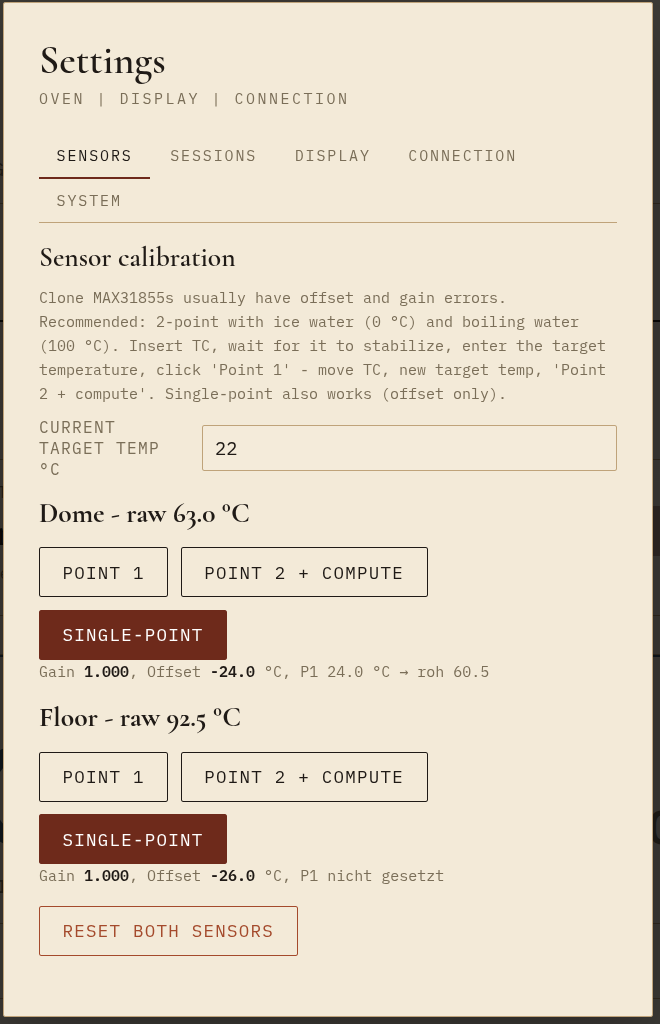
The ADC offset is solved by a 2-point calibration in the web UI:
1. Ice water — water plus plenty of ice cubes gives almost exactly 0°C. Dip TC, wait 30 s, in Settings → Sensors hit "Point 1"
2. Boiling water — 100°C at sea level, less at altitude. Move TC, wait 30 s, hit "Point 2 + compute"
3. Gain and offset get saved to NVS, done
After calibration both sensors land at ±15°C at 500°C — good enough for a wood oven, where the dome temperature varies by 20-30°C anyway. Want better? Buy the Adafruit original. For pizza and bread, clone-plus-calibration is plenty.
For verification there's a diagnostic endpoint `/api/maxdiag` — it shows the raw 32-bit values and fault flags. Saved me hours of debugging.
Three Engineering Details That Matter More Than They Look
3-read burst with median filter per sample. Even after calibration, clone MAX31855s wobble by ~0.5–1 °C and throw sporadic NaN from glitching SPI reads. Three reads per tick, take the median — the curve goes visually quiet and individual dropouts just fall out.
Partial push on the TFT instead of full frame. A full sprite push is 320×240×16 = 153 KB per update. On cheap ILI9341 modules without a TE pin you see that as flicker. Fix: push only the dynamic regions per screen, static chrome stays put after the first paint. Cuts SPI traffic by around 80 % and the tearing is gone.
Optional SHT31 as ambient reference. The I²C sensor lives on the case, ~10 cm away from the hot masonry, shielded from direct radiation. If it isn't there, firmware hides the ambient row automatically. What it unlocks:
- Newton cooling prediction: during cool-down the firmware live-fits the time constant k from the last 5 min — linearised via `ln(T − T_amb)`, then a plain linear regression. Display chart and web then show "oven at 200 °C in 1h45min, at 100 °C in 5h30min". Genuinely useful for timing when the bread goes in.
- Dew point via Magnus formula (Sonntag-1990 coefficients, ±0.4 °C). Compact mini-stat under the web chart. For outdoor installs, a good condensation indicator — if the dome drops below the dew point overnight, you get sweat water.
- Two extra HA sensors (`amb_t`, `amb_rh`) show up in long-term statistics automatically.
A 5 € sensor, three meaningful functions — no requirement, but a clear bump in usefulness.
A Timer That Learns
Default bake times are a good starting point, but every oven is different. Fireclay holds heat differently than a thin-walled dome, beech burns differently than oak, a 30 cm pizza needs longer than a 28. Rather than freezing on a hundred generic defaults, the timer learns from the bakes actually run.
How it works: every start picks the program default and adjusts it to the current oven temperature. Hotter oven → suggestion a bit shorter, cooler oven → longer. When the operator hits "Stop", the system remembers the actual time. From the third bake in the same program onwards, the average of those three becomes the new baseline. Keep stopping when the pizza is done and the value gradually drifts towards reality — automatically tuned per oven, per wood, per pizza size.
On top, the cooling alarm: when a timer is running and the oven cools faster than the program window allows, a warning fires. Useful for finishing bread — if floor temperature drops below 200°C, it's time to feed the fire or pull the loaf.
And a ready-gate: timer only starts if the oven is in the target window. Prevents accidentally hitting the 90-second pizza timer while the dome is still at 250°C. If override is really needed, there's a force flag — e.g. for the occasional bread-pizza.
Home Assistant and Session Logger
Home Assistant picks the controller up automatically — MQTT auto-discovery creates two sensors (dome, floor) with `state_class: measurement`, a program selector and a ready binary sensor. That puts the temperatures into long-term statistics — heat-up and cool-down curves are visible over weeks.
The program select is bidirectional: switch from HA and the display + NVS follow. Useful when the operator wants to flip from "Pizza Napoletana" to "Bread loading" from the kitchen without walking outside.
In parallel, the ESP runs a session logger: every firing is recorded as CSV on LittleFS. Auto-start above 60°C, auto-stop after 10 min below 40°C, max. 12 sessions ring buffer. The web UI shows a list with download buttons — the CSV ends up in Excel or Grafana. Lets you trace how different wood loads affect heat-up or how fast the oven cools overnight. For tuning the program defaults, this logger was decisive.
Offline tolerance mattered to me: if WiFi drops, the oven keeps running. Display, sensors, timer, all functional. Only HA waits for reconnect — the watchdog retries every 30 seconds. The captive portal only opens on first config or an explicit reset — otherwise the device would hang in setup mode on every brief router hiccup, and that wasn't an option.
OTA updates over mDNS (`backofen.local`) take the flashing cable out of the loop once the device is on the network.
What Stuck With Me
Three things I'd do differently next time — and a few I got right and would build the same again:
Two SPI buses straight away, not shared SPI. Saves hours of debugging bus locks and race conditions between display and MAX31855.
5 V plug supply, not a power bank. Backlight flicker and touch dropouts were pure power issues, not code. Clear signal when the display twitches: check the supply first, then the software.
AsyncMqttClient instead of PubSubClient. Publishing from the main loop had task-race issues — the async client is cleaner, no more watchdog reset on the first WiFi hiccup.
Captive portal only on first configuration. The first version popped the config mode on every WiFi drop — after the second router reboot the oven was suddenly offline. Now: only on explicit WiFi reset (hold BOOT during power-on).
Em-dash and mid-dot are not in every Adafruit GFX font. Stick to ASCII on the display, otherwise tofu rectangles.
TX LED blinks in sync with the display push. Clone DevKits with the CH343P USB bridge wire their TX/RX LEDs straight to UART0 (GPIO43/44). If UART0 isn't actively driven, the SPI burst couples in capacitively, the CH343 reads it as "UART traffic" and blinks along. Looked like a software bug — was pure crosstalk. Fix: drive GPIO43 high after `Serial0.end()` (UART idle), set GPIO44 to `INPUT_PULLUP`.
On the roadmap: a PCB instead of the DevKit (60×40 mm, 2-layer with TPS63020), Adafruit-original MAX31855 as plan B if the clones drift one day, a door reed sensor for smarter cooling detection, and maybe an MLX90614 IR pyrometer as a contactless floor surface sensor — that could measure the hotter stone floor directly, instead of just the air above it.
If you have a wood-fired oven or a stone baker at home and run Home Assistant anyway, this is a very worthwhile weekend build. In ongoing test operation the controller has been stable — the temperature curve is visibly calmer, the floor stops scorching, and every session lands in the CSV archive. After just two firings, the program defaults already started drifting noticeably towards reality.
More technical details about this project:
View Project →* Advertising — Links marked with an asterisk (*) are affiliate links. If you purchase through these links, I receive a small commission — the price stays the same for you.
Mike Sobczinski
Embedded developer and shift worker in the semiconductor industry. Builds IoT solutions with ESP32, LoRa, and Home Assistant — from firmware to dashboard.
Learn more →